Deploy your first app to Kubernetes with Gimlet CLI
In this tutorial, you will deploy your application to Kubernetes without writing lengthy deployment manifests. You will use the Gimlet CLI for this task.
This is the command line variation of the Deploy your first app to Kubernetes tutorial that used the Gimlet Dashboard to achieve this task. Skip this page if you prefer to use the dashboard.
Prerequisites
- A running Gimlet installation.
- An application hosted on Github.
- A Github Action workflow, or CircleCI pipeline, that builds a container image from your source code.
Install the Gimlet CLI
curl -L https://github.com/gimlet-io/gimlet/releases/download/cli-v0.21.0/gimlet-$(uname)-$(uname -m) -o gimlet
chmod +x gimlet
sudo mv ./gimlet /usr/local/bin/gimlet
gimlet --version
Authenticate to Gimlet
After signing in to Gimlet, navigate to your profile settings
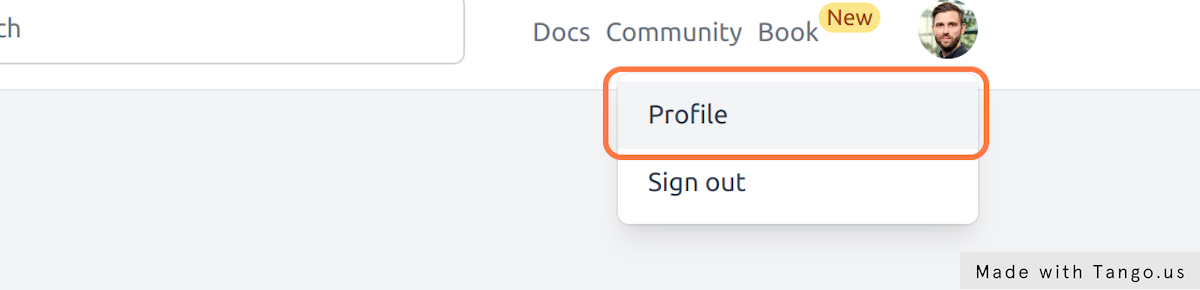
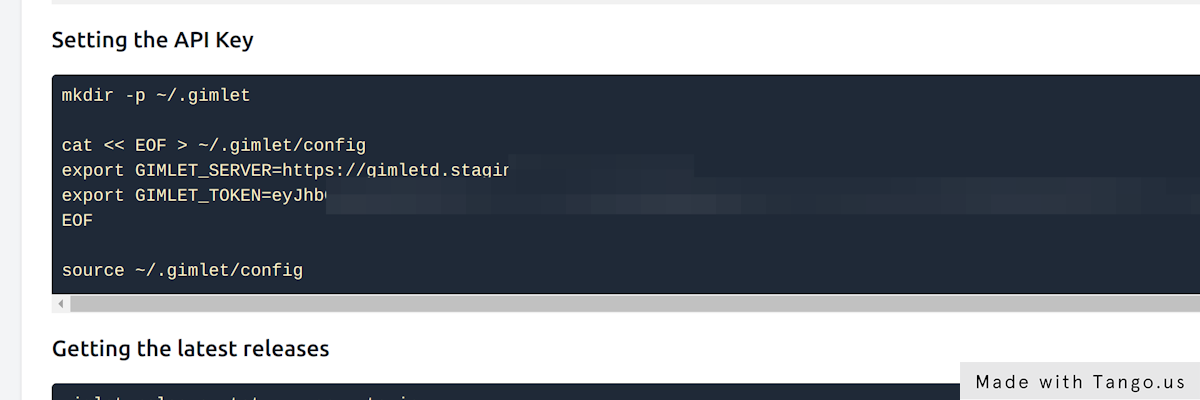
Run the code snippet located in _ Profile > Gimlet CLI access_ to configure the CLI to access the Gimlet API server.
Create the Gimlet environment manifest
Gimlet captures the deployment configuration in your source code repository. The Gimlet environment manifest files that are stored in the .gimlet folder, each capture the complete configuration of a given environment. It is a declarative format to configure which Helm chart, what chart version, and what parameters should be deployed to an environment.
In this tutorial, you are going to deploy your application to your testing environment. The tutorial will deploy the gimlet-io/demo-app application to the staging environment, you can pick your testing environment from the configured environments on the Gimlet dashboard's Environments tab. Replace the values to match your setup.
Start the environment configuration by creating the Gimlet environment manifest file first.
mkdir .gimlet/
gimlet manifest configure -f .gimlet/staging-demo-app.yaml
  --env staging \
  --app demo-app \
  --namespace staging \
Set the environment to staging, application name to demo-app and namespace to staging then close the browser tab.
This will create the environment file, without any deployment configuration specific to your app:
- it holds the application's name, environment, and namespace
- the Helm chart that is used as the application deployment template, and its version
- the Helm chart values, that are now empty
- and some place holders should you want to use Kustomize later for post porcessing, or if you want to add raw yamls into your config
---
app: myapp
env: staging
namespace: staging
chart:
  repository: https://chart.onechart.dev
  name: onechart
  version: 0.38.0
values: {}
strategicMergePatches: ''
json6902Patches: []
manifests: ''
What namespace to deploy to
Namespaces are arbitrary groupings of deployed resources on Kubernetes. They are really name spaces, you can have identically called resources in different namespaces, they will not collide.
Because namespaces are an arbitrary grouping, your team probably has a preferred namespace structure that serve you well.
At Gimlet, as a rule of thumb, we use the environment name as namespace. For this tutorial, follow this practice and set the namespace as staging.
Configure the deployment
Gimlet defaults to the OneChart Helm chart for web application deployment. It captures the most common use cases of web applications, so you don't have to maintain your own Helm chart.
To tailor the deployment configuration of your application, you can manually edit the environment file's values section as it is really nothing more than the values.yaml file for Helm charts, but for convenience, Gimlet starts a configuration page with the following command:
gimlet manifest configure -f .gimlet/staging-demo-app.yaml
👩💻 Configure on http://127.0.0.1:24349
👩💻 Close the browser when you are done
Want to know more about Helm?
Check out our SANE Helm guide.
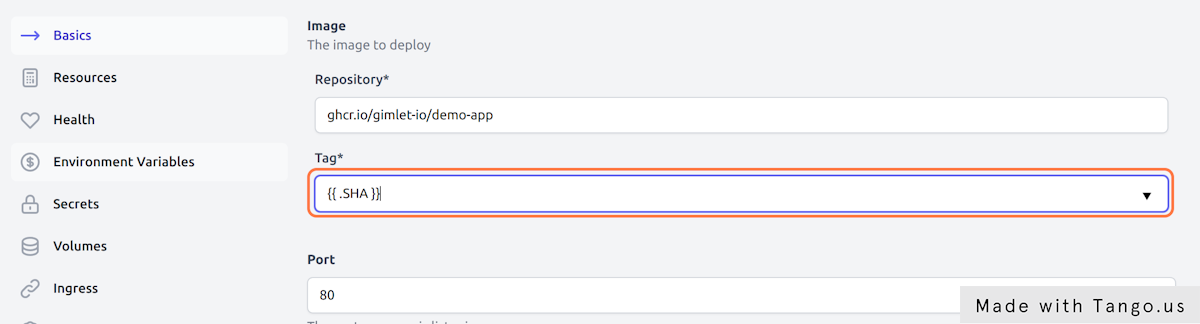
Set the image you want to deploy
As a prerequisite, your CI process already builds a Docker image from your application source code. And it follows a tagging strategy too.
The demo-app uses the Github container registry (ghcr.io) to host the docker image, and uses the repository name as image name. Images are tagged by the hash of the commit that kicked off the CI build
Set the image repository and tag on the configuration screen. This tutorial sets ghcr.io/gimlet-io/demo-app and {{ .SHA }} respectively.
If you don't have a docker image built
You can still continue this tutorial, use the CNCF's testing image, ghcr.io/podtato-head/podtatoserver with the v0.1.1 tag. It runs a webserver on port 9000.
Watch out for the container port
Time to set the port your application is serving traffic on. It is a common mistake that developers not setting the right port in the deployment configuraton and when they try to open the deployed app in the browser, they get a HTTP 503.
The demo-app serves traffic on port 9000. Set your own port.
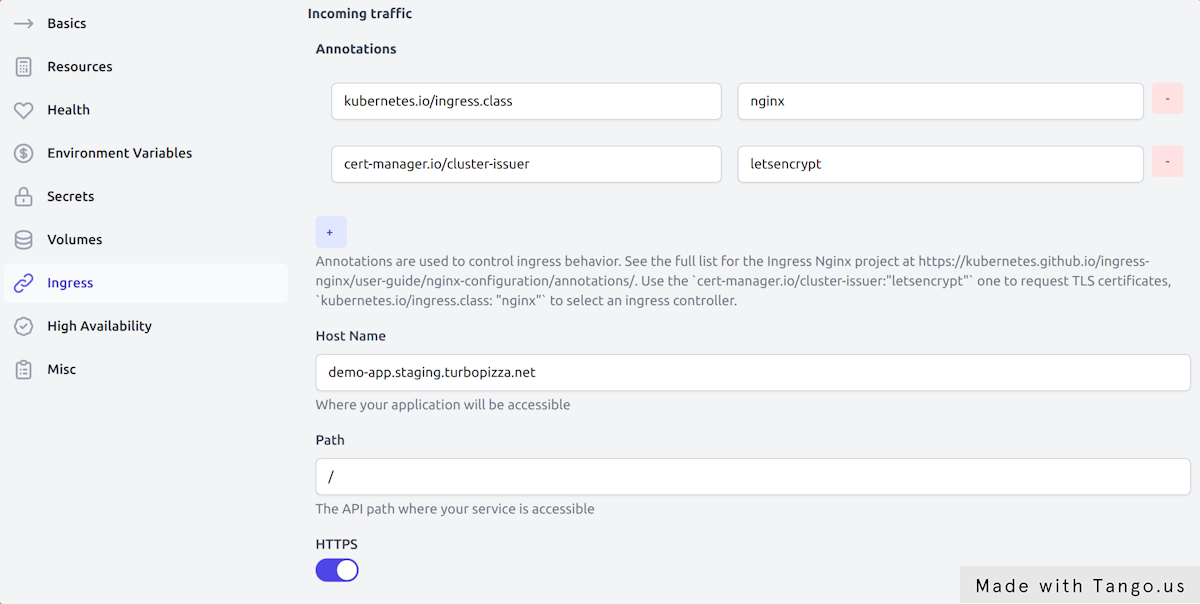
Set the domain name for the deployment
With the image name, tag and container port set, the final thing to set is the url of your application.
Gimlet environments are served with wildcard DNS entries, so $app.$env.yourcompany.com will be routed to the right application.
- Set the Host Name according to the naming convention. We set
demo-app.staging.turbopizza.net - Enable the HTTPS toggle. A certificate from Let's Encrypt will be provisioned for you.
- Add an annotation
kubernetes.io/ingress.class: "nginx"to match your configuration with the right Ingress Controller in your environment. - Add an annotation
cert-manager.io/cluster-issuer:"letsencrypt"to tell Cert Manager to provision an SSL certificate
Save your deployment configuration
When you are done configuring, close the browser tab, and the values you set are written in the .gimlet/staging-demo-app.yaml file.
Inspect the file, commit and push it to git.
Integrate CI with Gimlet
CI pipelines lint, test, build and then deploy applications.
Gimlet assumes the gitops deployment tasks from your CI pipeline and runs them centralized. CI pipelines can call the Gimlet API to deploy, no need to script the deploy in CI.
Integrate Github Actions
In order to integrate Github Actions with Gimlet, you need to add the Gimlet Github Action in your CI pipeline to deploy your application.
You typically add this after your docker image build step, where you would normally place the deploy step in your pipeline.
Gimlet doesn't take control of your CI workflow, you can keep organizing your CI pipelines as you desire and call Gimlet's API whenever you need to perform a gitops operation.
name: Build
on:
  push:
    branches:
      - '*'
jobs:
  build:
    name: 👷 Build
    runs-on: ubuntu-latest
    steps:
      - name: ⬇️ Check out
        uses: actions/checkout@v1
        with:
          fetch-depth: 1
      - name: 🐋 Set up Docker Buildx
        uses: docker/setup-buildx-action@v1
      - name: Login to GitHub Container Registry
        uses: docker/login-action@v1
        with:
          registry: ghcr.io
          username: ${{ github.repository_owner }}
          password: ${{ secrets.PAT }}
      - name: 🐋 Build and push docker image
        uses: docker/build-push-action@v2
        with:
          context: .
          file: Dockerfile
          platforms: linux/amd64
          push: true
          tags: |
            ghcr.io/gimlet-io/demo-app:${{ github.sha }}
      - name: 🚀 Deploy / Staging
        uses: gimlet-io/gimlet-artifact-shipper-action@v0.8.0
        with:
          DEPLOY: 'true'
          ENV: 'staging'
          APP: 'demo-app'
        env:
          GIMLET_SERVER: ${{ secrets.GIMLET_SERVER }}
          GIMLET_TOKEN: ${{ secrets.GIMLET_TOKEN }}
Integrate CircleCI
In order to integrate with CircleCI, you need to add the Gimlet CircleCI Orb in your CI pipeline to deploy your application.
You typically add this after your docker image build step, where you would normally place the deploy step in your pipeline.
Gimlet doesn't take control of your CI workflow, you can keep organizing your CI pipelines as you desire and call Gimlet's API whenever you need to perform a gitops operation.
version: 2.1
orbs:
  gimlet: gimlet-io/circleci-orb@4.0.0

workflows:
  master-build:
    jobs:
      - test: {}
      - build_docker:
          requires:
            - test
      - gimlet/gimlet-artifact-push:
          name: 🚀 Deploy / Staging
          context:
            - Gimlet
          deploy: 'true'
          env: 'staging'
          app: 'demo-app'
          requires:
            - build_docker
The Gimlet Context holds two environment variables in this example: GIMLET_SERVER and GIMLET_TOKEN.
Obtain Gimlet API credentials
For the CI deploy steps to work, you need to provide access to the Gimlet API. You need to set two secrets GIMLET_SERVER and GIMLET_TOKEN.
- Set
GIMLET_SERVERto https://gimletd.<<yourcompany.com>> - Set
GIMLET_TOKENto a Gimlet API key
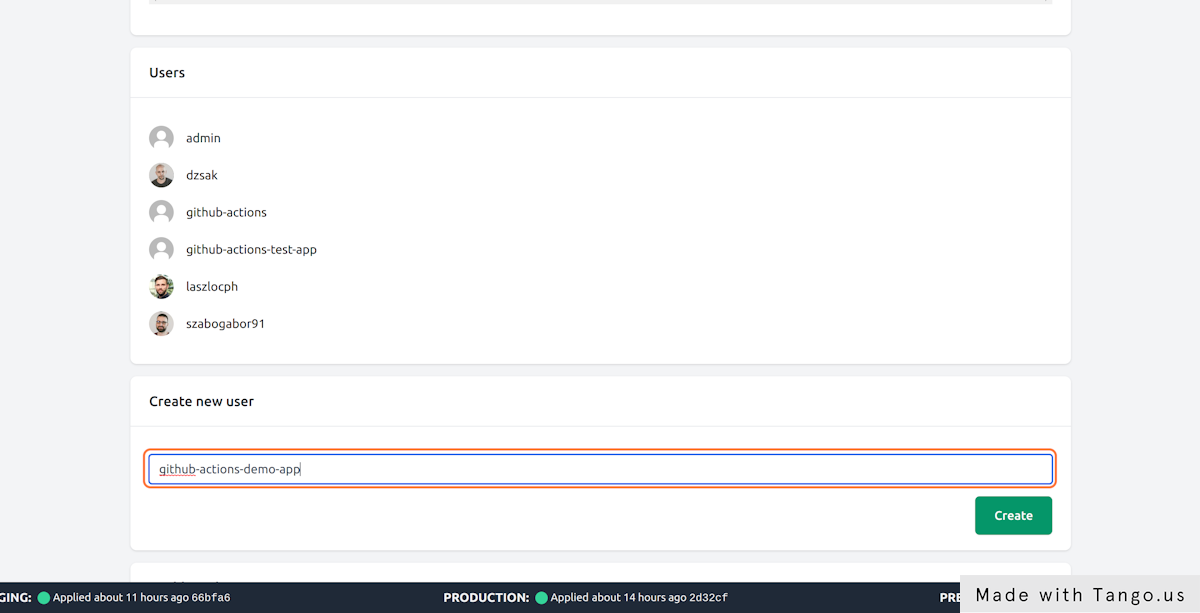
To create a Gimlet API key navigate to Profile > Create a new user in Gimlet and add a user for this integration.
Make a dummy commit to see it deploy
Push a dummy commit once you made the changes to your CI pipeline.
CI will call the Gimlet API, and Gimlet will make a gitops based deployment of your application. You can track the CI step output for details.
Deploying..
Deployment ID is: ff11eb64-2f94-49c3-ac07-e9274735096c
👉 Request (ff11eb64-2f94-49c3-ac07-e9274735096c) is new
	⏳ The release is not processed yet...
👉 Request (ff11eb64-2f94-49c3-ac07-e9274735096c) is processed
	📖 demo-app -> staging, gitops hash 176da9babbd7647fc68f3c5268a86a1d5fc6669a, status is NotReconciled
👉 Request (ff11eb64-2f94-49c3-ac07-e9274735096c) is processed
	📖 demo-app -> staging, gitops hash 176da9babbd7647fc68f3c5268a86a1d5fc6669a, status is DependencyNotReady
👉 Request (ff11eb64-2f94-49c3-ac07-e9274735096c) is processed
	📖 demo-app -> staging, gitops hash 176da9babbd7647fc68f3c5268a86a1d5fc6669a, status is ReconciliationSucceeded
Gimlet processed the deploy request and generated a gitops commit with hash 176da9babbd7647fc68f3c5268a86a1d5fc6669a. Then the CI step waited until the gitops commit was applied on the cluster by Flux:
You should see the deployed resources in Kubernetes, and you can also cross-reference the generated gitops commit (With hash 176da9babbd7647fc68f3c5268a86a1d5fc6669a in the logs above) in the gitops repository.
Can't see the deployed application?
You can debug the gitops automation to see what went wrong.