Databases
The Redis and PostgreSQL Megapost

Laszlo Fogas
Right after someone deploys their first application with Gimlet comes the question of how to deploy a Redis next to the app?
In this post I am going to walk you through
- how to deploy a containerized Redis next to your app,
- how to deploy a containerized PostgreSQL next to your application,
- and examine the pros and cons of this approach.
- Plus, I am going to introduce the concept of a multi-tenant PostgreSQL deployment and taking a peak into platform engineering.
- Oh, and you will deploy pgAdmin on a URL to manage PostgreSQL.
How to deploy a containerized Redis next to your app?
Step #1 - Start with deploying a default app
This will give you a Gimlet manifest file that you can modify to your needs, eg.: deploying a Redis container.
- Navigate to your application repository in Gimlet
- Click New Deployment..
- Set Name as redis
- Add an secret under Encrypted Secrets
- Set
redis-passwordas key - Set a strong password as value. Make a not of this password
- Hit Encrypt
openssl rand -hex 20is a command I often use to generate passwords
- Set
- Leave everything else on default
- Push Deploy, and after the confetti Write Configuration to Git
This creates a Gimlet manifest file in your source codde repository under the .gimlet/ folder.
You will edit this file by hand to make it a Redis container.
Gimlet Manifest Intro
Even though you can create deployments on the Gimlet UI, everything you do is captured into a yaml file stored under the .gimlet/ path in your application repository, called the Gimlet manifest file. You create one manifest file per application deployed in an environment.
This is how it looks normally, when you deploy Gimlet's web application template with default settings, plus the redis-password secret you set, but it does not support Redis as of yet.
app: redis
env: lasting-frost
namespace: default
chart:
  repository: https://chart.onechart.dev
  name: onechart
  version: 0.70.0
values:
  gitRepository: laszlocph/streamlit-app
  gitSha: '{{ .SHA }}'
  image:
    registry: public
    strategy: static
    repository: nginx
    tag: "1.27"
  ingress:
    annotations:
      cert-manager.io/cluster-issuer: letsencrypt
      kubernetes.io/ingress.class: nginx
    host: laszlocph-streamlit-app-eyujopnt.gimlet.app
    tlsEnabled: true
  resources:
    ignoreLimits: true
  sealedSecrets:
    redis-password: AgADJwpDBgGxxxxxxxxxxxxxxx
Step #2 - Extending Gimlet Manifest with Redis
The default deployment uses a web-application template (the chart field). It takes a container image (values.image) and deploys it on an URL (values.ingress.host).
For Redis you are going to use an open-source template, the Bitnami Redis Helm chart. To do that, do a cleanup first in the Gimlet manifest, and use the manifests field to break out of the usual paradigms Gimlet uses, and deploy plain kubernetes resources.
app: redis
env: lasting-frost
namespace: default
-chart:
-  repository: https://chart.onechart.dev
-  name: onechart
-  version: 0.70.0
-values:
-  gitRepository: laszlocph/my-app
-  gitSha: '{{ .SHA }}'
-  image:
-    registry: public
-    strategy: static
-    repository: nginx
-    tag: "1.27"
-  ingress:
-    annotations:
-      cert-manager.io/cluster-issuer: letsencrypt
-      kubernetes.io/ingress.class: nginx
-    host: laszlocph-my-app-eyujopnt.gimlet.app
-    tlsEnabled: true
-  resources:
-    ignoreLimits: true
-  sealedSecrets:
-    redis-password: AgADJwpDBgGxxxxxxxxxxxxxxx
+manifests: |
+  ---
+  apiVersion: source.toolkit.fluxcd.io/v1
+  kind: HelmRepository
+  metadata:
+    name: bitnami
+    namespace: default
+  spec:
+    interval: 60m
+    url: https://charts.bitnami.com/bitnami
+  ---
+  apiVersion: helm.toolkit.fluxcd.io/v2
+  kind: HelmRelease
+  metadata:
+    name: redis
+    namespace: default
+  spec:
+    interval: 60m
+    releaseName: redis
+    chart:
+      spec:
+        chart: redis
+        version: 20.1.3
+        sourceRef:
+          kind: HelmRepository
+          name: bitnami
+        interval: 10m
+    values:
+      commonAnnotations:
+        gimlet.io/git-repository: laszlocph/my-app
+        gimlet.io/git-sha: '{{ .SHA }}'
+        gimlet.io/app: redis
+      architecture: standalone
+      #Uncomment the next 3 lines if you want your Redis to be highly available
+      #architecture: replication
+      #replica:
+      #  replicaCount: 1
+      auth:
+        existingSecret: redis
+      commonConfiguration: |-
+        # Enable AOF https://redis.io/topics/persistence#append-only-file
+        appendonly yes
+        # Disable RDB persistence, AOF persistence already enabled.
+        save ""
+        # https://redis.io/docs/latest/operate/oss_and_stack/management/config/#configuring-redis-as-a-cache
+        maxmemory 100mb
+      master:
+        persistence:
+          enabled: false
+          #Uncomment the following two lines to enable persistence
+          #enabled: true
+          #size: 1Gi
+        resources:
+          limits:
+            memory: 128Mi
+            cpu: 250m
+          requests:
+            memory: 128Mi
+            cpu: 10m
+  ---
+  apiVersion: bitnami.com/v1alpha1
+  kind: SealedSecret
+  metadata:
+    name: redis
+    namespace: default
+    annotations:
+      sealedsecrets.bitnami.com/cluster-wide: "true"
+  spec:
+    encryptedData:
+      redis-password: AgADJwpDBgGxxxxxxxxxxxxxxx
+    template:
+      metadata:
+        name: redis
+        namespace: default
It is quite a yaml file. The full power of Kubernetes is at your fingertips if you use the manifests field, but that also comes with the excess configuration need compared to the built in web-application template.
But essentially, you create three Kubernetes resources above:
- a
HelmRepository - a
HelmRelease - and a
SealedSecret.
The HelmRepository resource is a mapping of the https://charts.bitnami.com/bitnami chart location to Kubernetes. If you are familiar with Helm, it correspondes to the helm repo add command.
The HelmRelease resource is the deployment parameters of the Helm chart template. If you are familiar with Helm, it correspondes to the helm install command. The spec.values field is where you do all Redis specific configuration. I provided a set of defaults, but you can configure it to your needs following the chart documentation.
The SealedSecret resource is an encrypted representation of the password you made note of in Step 1) of this blog post. Notice that spec.encryptedData.redis-password is the same value as the one you deleted in values.sealedSecrets.redis-password. Make sure to copy over the encrypted value.
One final thing you need to do is to set the gimlet.io/git-repository: laszlocph/my-app line. Set the value to your Github repository owner and name. This line helps Gimlet to pair the deployment with the repository.
Step 3) - Deploy Redis
Once you made a git commit of the file edits you made in step 2), locate the commit in Gimlet Repositories > your repository > Commits tab and deploy the commit with the Deploy.. button.
The Redis deployment shows up as a regular deployment, with the regular tools at your hands: logs, describe the deployments or restart it.


Step 4) - Verify and Set Connection Parameters
Once you deployed the manifests, you can verify Redis with the following commands:
(To get Kubectl access on Gimlet cloud, check out Deploy a cloud shell blog post)
$ kubectl exec -it redis-master-0 --namespace default -- bash
I have no name!@my-redis-master-0:/$ redis-cli
127.0.0.1:6379> auth super-secret-password-you-made-note-of
OK
127.0.0.1:6379> keys *
(empty array)
The last step is to set the Redis connection parameters in your application.
The best practice is to use environment variables to configure your application. You can set them in the deployment configuration, and you can also use secrets.
- Connection URL:
redis-master.default.svc.cluster.local - Password: the one you made note of earlier
How to deploy a containerized PostgreSQL next to your app?
Deploying a containerized PostgreSQL does not differ much from the Redis deployment. We are going to deploy the bitnami/postgresql container image that you are most likely familiar with from local docker-compose based setups, and use the Bitnami PostgreSQL Helm chart to get the best practices Bitnami packaged into this chart.
Step #1 - Start with deploying a default app
This will give you a Gimlet manifest file that you can modify to your needs, eg.: deploying a PostgreSQL container.
- Navigate to your application repository in Gimlet
- Click New Deployment..
- Set Name as postgresql
- Add an secret under Encrypted Secrets
- Set
postgres-passwordas key - Set a strong password as value. Make a not of this password
- Hit Encrypt
openssl rand -hex 20is a command I often use to generate passwords
- Set
- Add an other secret under Encrypted Secrets
- Set
pgadmin-passwordas key - Set a strong password as value. Make a not of this password
- Hit Encrypt
openssl rand -hex 20is a command I often use to generate passwords
- Set
- Leave everything else on default
- Push Deploy, and after the confetti Write Configuration to Git
This creates a Gimlet manifest file in your source codde repository under the .gimlet/ folder.
You will edit this file by hand to make it a Redis container. You read a quick intro about this file earlier in this blog post in Gimlet Manifest Intro.
Step #2 - Extending the Gimlet Manifest with PostgreSQL
The default deployment uses a web-application template (the chart field). It takes a container image (values.image) and deploys it on an URL (values.ingress.host).
For PostgreSQL, you are going to use an open-source template, the Bitnami PostgreSQL Helm chart. To do that, do a cleanup first in the Gimlet manifest, and use the manifests field to break out of the usual paradigms Gimlet uses, and deploy plain kubernetes resources.
app: postgres
env: lasting-frost
namespace: default
-chart:
-  repository: https://chart.onechart.dev
-  name: onechart
-  version: 0.70.0
-values:
-  gitRepository: laszlocph/my-app
-  gitSha: '{{ .SHA }}'
-  image:
-    registry: public
-    strategy: static
-    repository: nginx
-    tag: "1.27"
-  ingress:
-    annotations:
-      cert-manager.io/cluster-issuer: letsencrypt
-      kubernetes.io/ingress.class: nginx
-    host: laszlocph-my-app-eyujopnt.gimlet.app
-    tlsEnabled: true
-  resources:
-    ignoreLimits: true
-  sealedSecrets:
-    postgres-password: "AgBTPyf/3A..."
-    pgadmin-password: "AADDDFfgr..."
+manifests: |
+  ---
+  apiVersion: source.toolkit.fluxcd.io/v1
+  kind: HelmRepository
+  metadata:
+    name: postgres
+    namespace: default
+  spec:
+    interval: 360m
+    url: https://charts.bitnami.com/bitnami
+  ---
+  apiVersion: helm.toolkit.fluxcd.io/v2
+  kind: HelmRelease
+  metadata:
+    name: postgres
+    namespace: default
+  spec:
+    interval: 60m
+    releaseName: postgres
+    chart:
+      spec:
+        chart: postgresql
+        version: 15.5.31
+        sourceRef:
+          kind: HelmRepository
+          name: postgres
+        interval: 10m
+    values:
+      commonAnnotations:
+        gimlet.io/git-repository: laszlocph/my-app
+        gimlet.io/git-sha: '{{ .SHA }}'
+        gimlet.io/app: postgres
+      auth:
+        existingSecret: postgres
+      architecture: standalone
+      tls:
+        enabled: true
+        autoGenerated: true
+      persistence:
+        enabled: true
+        size: 8Gi
+      persistentVolumeClaimRetentionPolicy:
+        enabled: true
+        whenScaled: Retain
+        whenDeleted: Retain
+  ---
+  apiVersion: bitnami.com/v1alpha1
+  kind: SealedSecret
+  metadata:
+    name: postgres
+    namespace: default
+    annotations:
+      sealedsecrets.bitnami.com/cluster-wide: "true"
+  spec:
+    encryptedData:
+      postgres-password: "AgBTPyf/3A..."
+    template:
+      metadata:
+        name: postgres
+        namespace: default
It is quite a yaml file. The full power of Kubernetes is at your fingertips if you use the manifests field, but that also comes with the excess configuration need compared to the built in web-application template.
But essentially, you create three Kubernetes resources above:
- a
HelmRepository - a
HelmRelease - and a
SealedSecret.
The HelmRepository resource is a mapping of the https://charts.bitnami.com/bitnami chart location to Kubernetes. If you are familiar with Helm, it correspondes to the helm repo add command.
The HelmRelease resource is the deployment parameters of the Helm chart template. If you are familiar with Helm, it correspondes to the helm install command. The spec.values field is where you do all Redis specific configuration. I provided a set of defaults, but you can configure it to your needs following the chart documentation.
The SealedSecret resource is an encrypted representation of the password you made note of in Step 1) of this blog post. Notice that spec.encryptedData.postgres-password is the same value as the one you deleted in values.sealedSecrets.postgres-password. Make sure to copy over the encrypted value.
One final thing you need to do is to set the gimlet.io/git-repository: laszlocph/my-app line. Set the value to your Github repository owner and name. This line helps Gimlet to pair the deployment with the repository.
Step 3) - Deploy PostgreSQL
Once you made a git commit of the file edits you made in step 2), locate the commit in Gimlet Repositories > your repository > Commits tab and deploy the commit with the Deploy.. button.
The PostgreSQL deployment shows up as a regular deployment, with the regular tools at your hands: logs, describe the deployments or restart it.


Step 4) - Verify PostgreSQL with pgAdmin
Once you deployed the manifests, you can verify PostgreSQL with pgAdmin.
To deploy pgAdmin, you are going to extend the Gimlet manifest with a new HelmRepository, HelmRelease and Ingress resources. Just like you did in Step 2).
app: postgres
env: lasting-frost
namespace: default
manifests: |
  ---
  apiVersion: source.toolkit.fluxcd.io/v1
  kind: HelmRepository
...
  apiVersion: bitnami.com/v1alpha1
  kind: SealedSecret
  metadata:
    name: postgres
    namespace: default
    annotations:
      sealedsecrets.bitnami.com/cluster-wide: "true"
  spec:
    encryptedData:
      postgres-password: "AgBTPyf/3A..."
    template:
      metadata:
        name: postgres
        namespace: default
+  ---
+  apiVersion: source.toolkit.fluxcd.io/v1
+  kind: HelmRepository
+  metadata:
+    name: runix
+    namespace: default
+  spec:
+    interval: 60m
+    url: https://helm.runix.net
+  ---
+  apiVersion: helm.toolkit.fluxcd.io/v2
+  kind: HelmRelease
+  metadata:
+    name: pgadmin
+    namespace: default
+  spec:
+    interval: 360m
+    releaseName: pgadmin
+    chart:
+      spec:
+        chart: pgadmin4
+        version: 1.31.0
+        sourceRef:
+          kind: HelmRepository
+          name: runix
+        interval: 60m
+    values:
+      existingSecret: postgres
+      secretKeys:
+        pgadminPasswordKey: pgadmin-password
+      service:
+        annotations:
+          gimlet.io/git-repository: laszlocph/my-app
+          gimlet.io/git-sha: '{{ .SHA }}'
+          gimlet.io/app: 'postgres'
+  ---
+  apiVersion: networking.k8s.io/v1
+  kind: Ingress
+  metadata:
+    name: pgadmin
+    namespace: default
+    annotations:
+      kubernetes.io/ingress.class: nginx
+  spec:
+    tls:
+      - hosts:
+          - "pgadmin-eyujopnt.gimlet.app"
+        secretName: tls-pgadmin
+    rules:
+      - host: "pgadmin-eyujopnt.gimlet.app"
+        http:
+          paths:
+            - path: "/"
+              pathType: "Prefix"
+              backend:
+                service:
+                  name: pgadmin-pgadmin4
+                  port:
+                    number: 80
The HelmRepository resource is a mapping of the https://helm.runix.net chart location to Kubernetes.
The HelmRelease resource is the deployment parameters of the Helm chart template. If you are familiar with Helm, it correspondes to the helm install command. The spec.values field is where you do all Redis specific configuration. I provided a set of defaults, but you can configure it to your needs following the chart documentation.
The Ingress resource is a mapping of pgAdmin to a URL. Remember, you started the PostgreSQL deployment by deploying a default app. The host value under values.ingress.host is going to be important now. It was of a form <appname>-eyujopnt.gimlet.app, the name of your app followed by a prefix. Make sure that you copy the that suffix into spec.tls.hosts[0] and spec.rules[0].host
One final thing you need to do is to set the gimlet.io/git-repository: laszlocph/my-app line. Set the value to your Github repository owner and name. This line helps Gimlet to pair the deployment with the repository.
Once you made a commit and deployed it with Gimlet, you should see the pgAdmin service card in Gimlet. By clicking on the ingress URL, log in with chart@domain.com and the password you made a note of in Step 1).


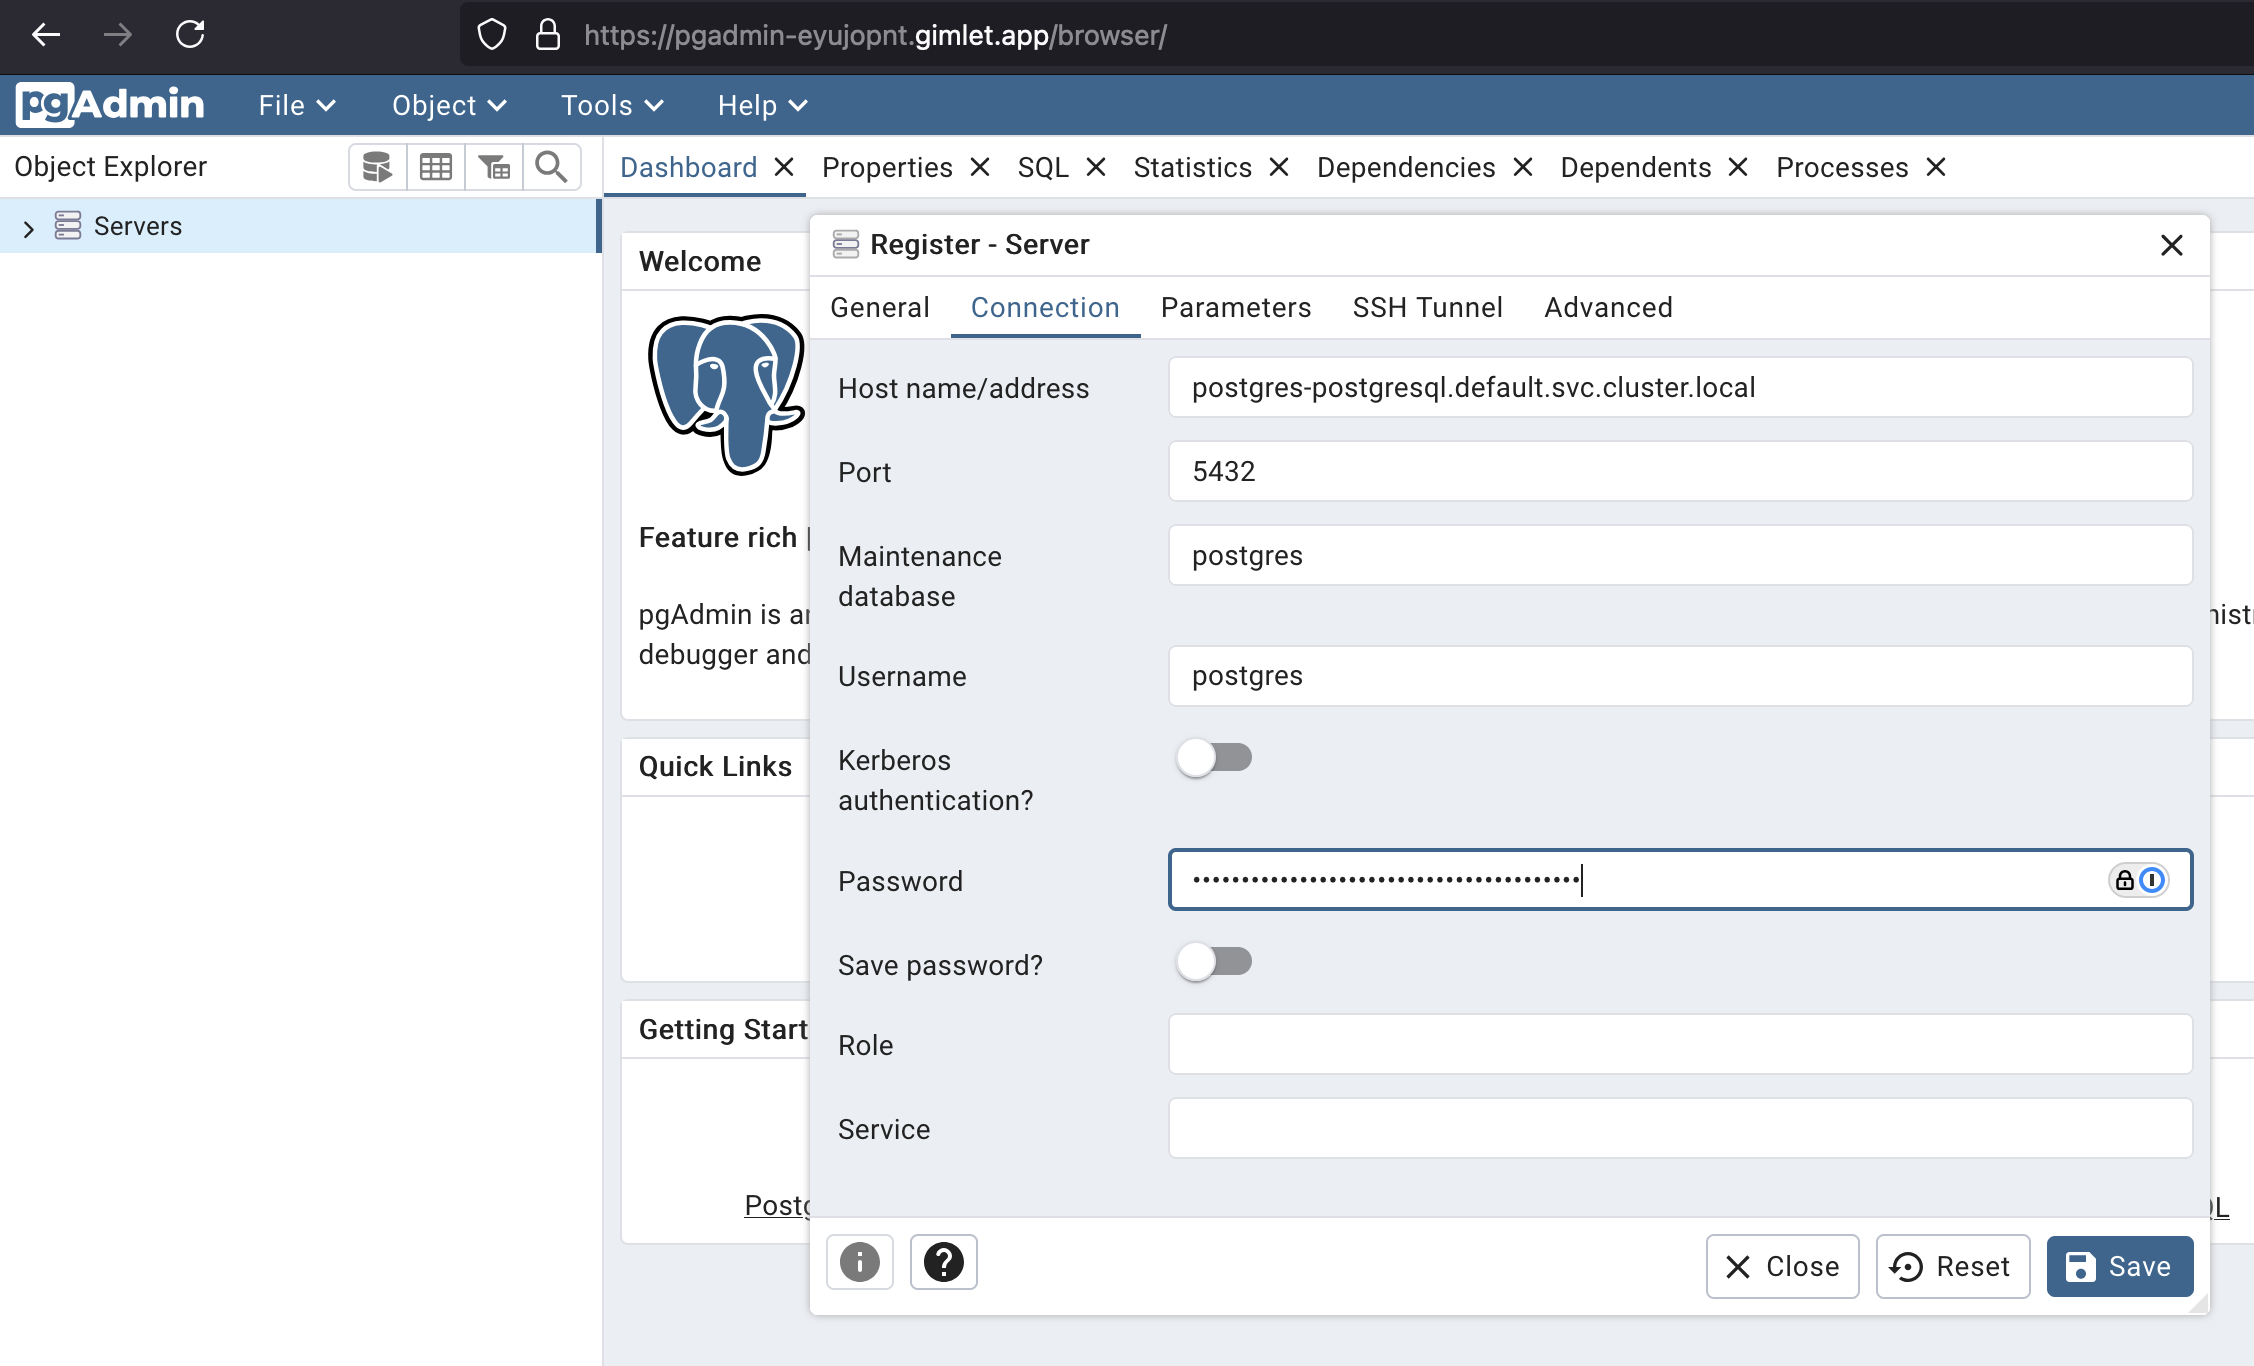

Step 5) - Set Connection Parameters in Your App
The last step is to set the PostgreSQL connection parameters in your application.
The best practice is to use environment variables to configure your application. You can set them in the deployment configuration, and you can also use secrets.
- Connection URL:
postgres-postgresql.default.svc.cluster.local - User:
postgres - Password: the one you made note of earlier
